How To Read The Beach: Easy Surf Fishing Tips
Knowing how to fish the surf is only half the battle. Learning where to fish is just as important! This is where learning how to read the beach for surf fishing or “how to read the surf” comes in. If you want to learn how to find structure like troughs, holes, rip currents, and other areas where fish like to hang out, this article will have all your answers.
Surf fish prefer to hang out and feed in areas that have good structure and water movement. So, as an angler, it’s important to be able to find and identify the structure. We’ll break down all the various water patterns that indicate good structure and give you easy ways to identify and remember them.
Reading the surf (or reading the water / reading the beach) is a method by which anglers analyze the water surface in an attempt to figure out what type of terrain they’re fishing.
Some of the structure and water patterns we look for include troughs, holes, deep pockets, rip currents and a few other important indicators.
For those of you who are extremely visual learners, check out the video below on reading the surf.
How To Read The Beach For Surf Fishing
When reading the beach, you should understand that the water’s surface is a blurry mirror of the structure that lies beneath it.
You will also need to watch the waves and pay attention to how the water forms and reacts for up to 60 seconds to form a conclusion of what you’re truly seeing.
This is because when a few seconds of bigger waves or stronger current comes in, you often aren’t able to read the beach clearly. Wait for calmer water and try to read as much as you can on both the incoming and receding water.
Let’s talk about the different types of water formations and movements we look for when surf fishing and how to identify them.
How To Identify A Trough In The Surf
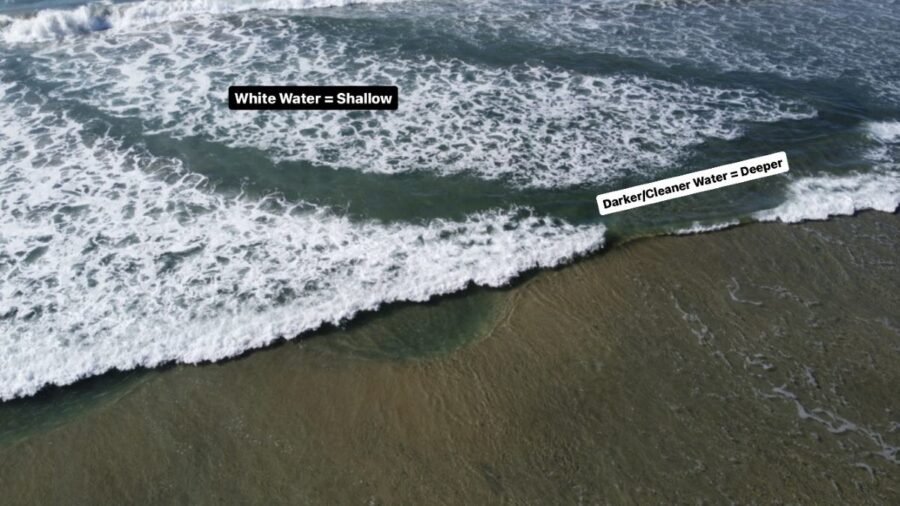
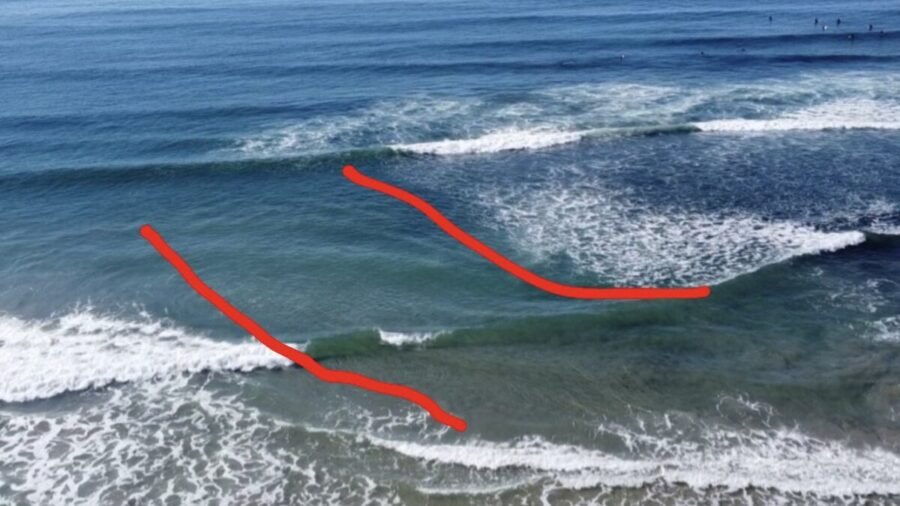
The image above shows what looks to be a U-shaped trough with a couple more smaller troughs near the bottom-center and bottom-left of the screen.
We can tell by the clean water. Later in this article, you’ll learn how clean water, darker blue/green water and waves that lose their crests indicate deep water.
Two articles that may help shorten the learning curve are one, how waves affect surf fishing, and two, what the best conditions are for surf fishing.
First, let’s answer the question, “what is a trough?” A trough is just a deep section of sand that runs parallel to, perpendicular to, or even diagonal from the shoreline.
Ranging from a few inches deeper, to a couple feet deeper than the surrounding sand, troughs are simply a submerged “trench”. They’re basically holes that are wider than long (or longer than wide depending on how you look at it).
More on Troughs: How To Read The Beach From Ground
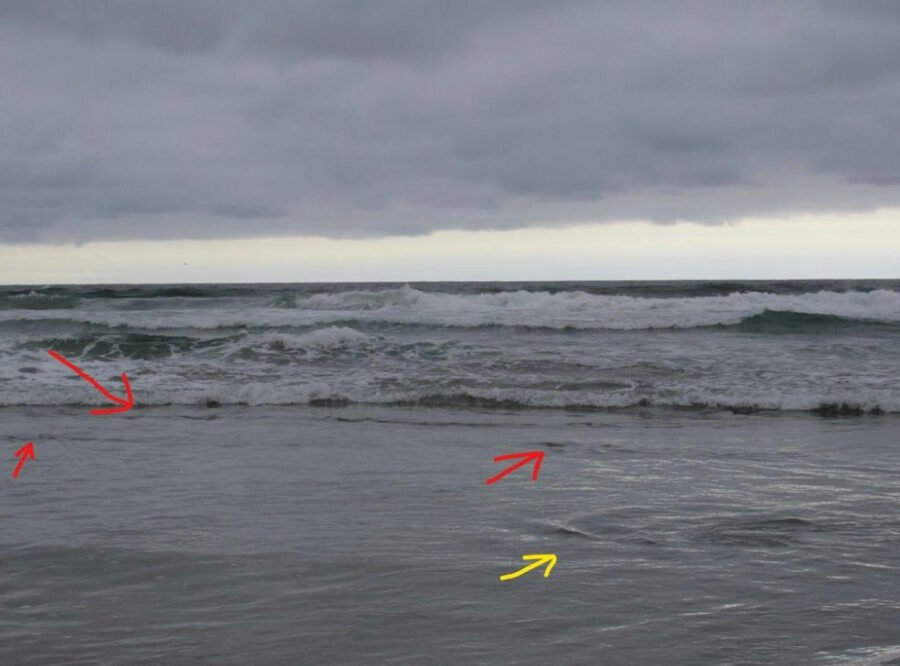
The red arrows in the image above indicate troughs that run parallel with the shoreline. It’s important to note that the image depicts a spot that will be optimal at a slightly higher tide. Ideally, we’d want a rising tide to fill in another foot or two of water.
However, this doesn’t mean a rising tide is always the best tide for surf fishing. Read the linked article to learn more about what the best tide for surf fishing is.
Troughs are important because fish like to swim through these dug-out sections looking for food. Sand crabs and other forms of baits are often burrowed in the sand in front of a trough. As the edge of that trough deteriorates, those sand crabs will be sucked over the trough. Fish will then take this opportunity to feed on them.
When you’re reading the surf, reading on both the incoming waves and the receding water is key. But often times, troughs are smaller versions of holes and the receding waves show more than the incoming waves.
As a wave approaches the shoreline, you might not see much if the trough is only a few inches deep. But, as the water begins to recede, the water will fill in the holes and dip down if there’s any sort of deeper section. The deeper the water, the tougher it is to read, but we’ll talk more about that later.
Identifying Deep Holes: How To Read The Beach
Holes, and troughs are all very similar. Depending on the angler, exact definitions and names for each term may vary.
Generally speaking, a trough is longer than wide and shallower than a hole. Usually when I call something a hole, it’s a large, deep area (ex. 50ft x 40ft). A hole can be longer than wide as well but I often interchange the terms as they are very similar.
The other key to identify a deep hole when reading the beach for surf fishing is to read on the incoming waves.
Take a look at the image below and I’ll show you how to identify a hole.
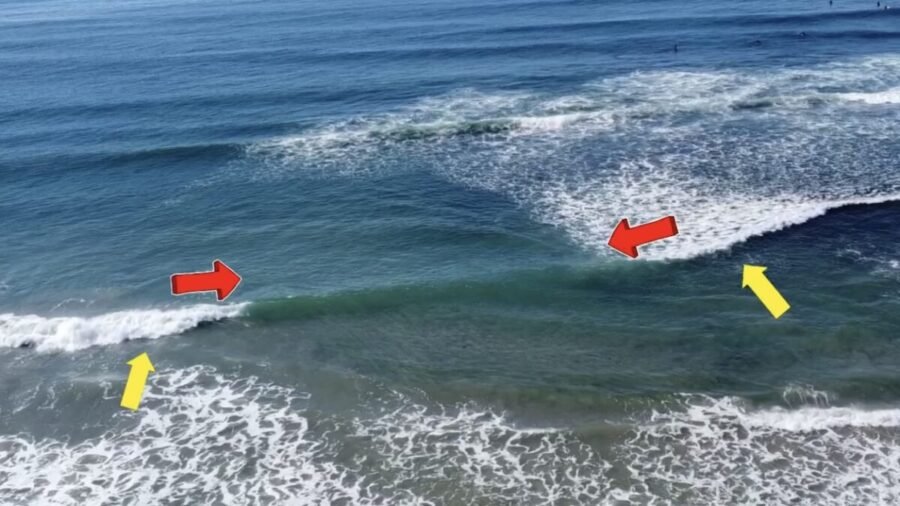
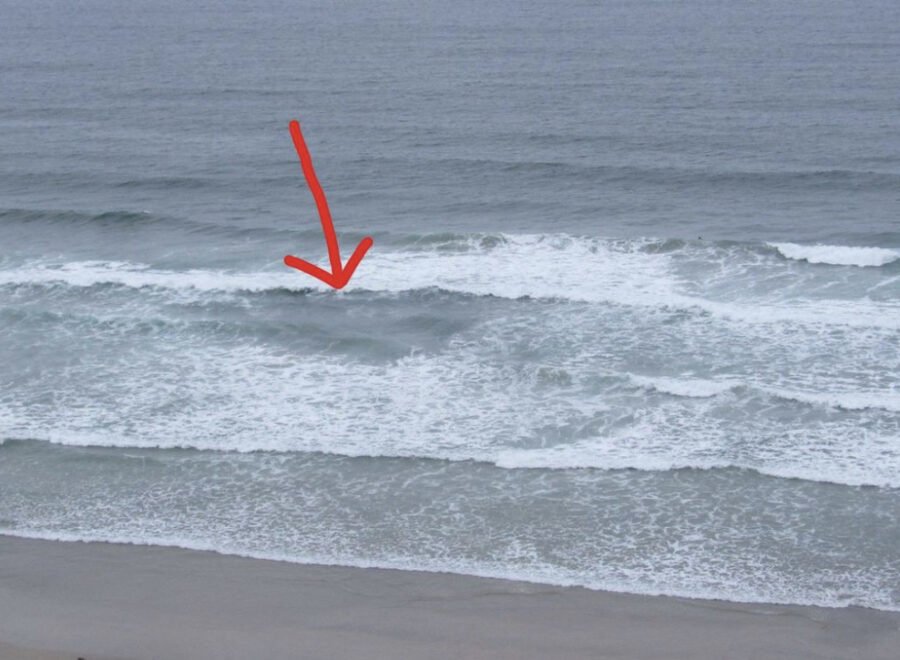
In the image above, the yellow arrows show what normal waves do when they break. The peak or “crest” of the wave maintains a healthy white crest of oxygenated water.
But between the red arrows is where the “crest” dissipates. This indicates a deep hole.
You see, what happens is that as the wave breaks, the gradual shallowing water gives the wave upward power, thus forming the “crest”. When the bottom drops down and becomes deeper, the wave no longer has enough power there to maintain a crest, so it loses it.
When water remains blue or green and relatively clear like this, you’ve identified a deep hole and you’ve learned where to fish.
The next image is of the same wave, 2 seconds later.
As you can see, this next image shows how the wave continued to break on the edges, but middle remained clear with blue/green water.
It’s breaking in a diagonal pattern and the deepest section is the upper right red line.
How To Read The Water Near Reef: Identifying Deep Water

This is a question I get fairly frequently. “How do you read the water and identify structure near reefs?” The answer – not much differently than you would at a sandy beach.
When you’re reading the beach on or near reef, just keep that in mind as you look for the same things we’ve trained our eyes to detect in the sections above.
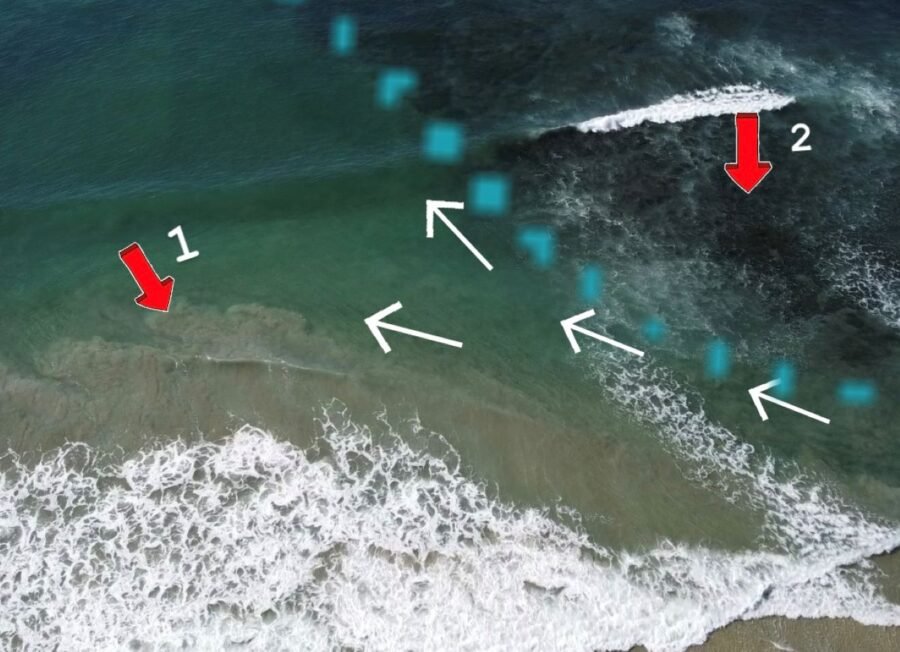
In the image above, we can see the red arrow with the number 2 next to it indicating that the dark section of water there is reef. Reef will look dark from above and you can often see the darker tone from the shore.
Additionally, reef will resemble shallow gradual water. This means waves will break over reef.
But, where the reef drops off, those are your holes. And often times, those are your money fishing zones because these drop offs can be dramatic and/or fall down to a sandy bottom. Perfect for big halibut.
The blue dotted line shows the outline of the reef and thus, the edge of the reef which leads to a drop off on its left/down side.
You can see the breaking white water directly above the red #2 arrow which shows that the wave will naturally break over it because it’s shallow there. But, to the left of the reef, it drops off as the crest is completely gone, indicating a deep hole.
The next red arrow (#1) and all the white arrows indicate the topic of our next section – a rip current.
Identifying Rip Currents: How To Read The Beach
Take another look at the image above in the last section. Locate the red arrow (#1) and the white arrows.
The red arrow (#1) shows the sand that is getting churned up and pulled to the left. The white arrows further indicate the water pulling through the deep diagonal cut formed by the reef’s edge mentioned earlier.
Rip Currents are another important indicator to be able to identify. A rip current occurs when some form of narrow channel pulls fast-moving water in a direction other than the shoreline.
They can be caused by all sorts of things, but usually it’s a combination of swell, terrain and a few other factors. One important scenario to look for is a rip current formed by (or that forms) a trough that runs perpendicular to the shoreline. In this scenario, you have structure and a rip all in one place.
these are good areas to try both bait and lure fishing. The easiest indicator of a rip is the white or sandy water that gets churned up and sucked out to sea. But the important area to us as anglers, is the cleaner blue water because it’s the deepest area and it’s what’s actually causing the rip.
Is There Such A Thing As “Too Much Structure?”
With a hole/deep pocket, very rarely is one “too big”. Maybe if it’s larger than 150-feet. The concern is, at that point, there’s less of an appeal to uniqueness because of its vastness. This brings up another good point that I think is more relevant – a multitude of structures rather than size of structure.
Sometimes, you’ll see no structure at all, other times, you’ll see structure everywhere (scallops, troughs, holes, rocks, etc.). If there’s no structure, I fish off feeling. This might sound confusing, but if you’ve fished long enough, or even surfed long enough, you’ll understand that even when you can’t see something and explain why it’s good, you can feel it. But, that’s way down the road.
If there is structure, I’m hoping to find it intermittently. I want most of the beach to look baron (or like there’s not much going on) and then I want to find two or three really good-looking spots.
That way, it almost leaves the fish with no reason not to be holding in the spots that I find. If there’s too much structure, what makes a fish hang out or feed in the one of many different spots that I found?
Reading The Water’s Surface: Wind Ripples And Clean Water
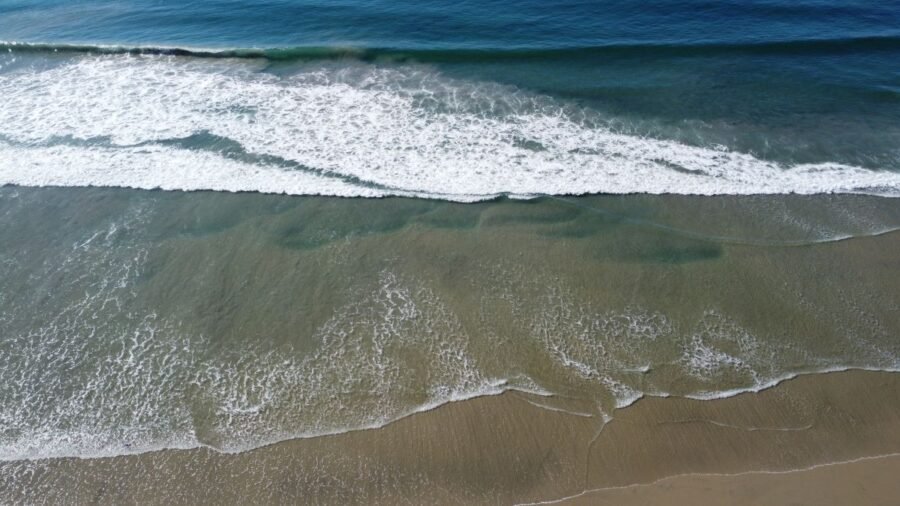
The image above is what I would call a deep pocket. This photo was taken from an aerial perspective. I would say the pocket is about 40 feet by 20 feet (maybe a little bigger). When you’re looking for holes, the same “dip” down can be seen as the water recedes after a wave.
It’s usually less dramatic than with troughs, and again, the deeper (further out) it is, the tougher to spot. The best way to spot a deep pocket or hole is to look for the clean water left after a wave passes (because the crest fell out) or sometimes look for what I call “wind ripples”.
The water above a deep pocket will look somewhat disturbed and there will be a lot of misdirection. At the same time, it will look calmer and cleaner than the water around it.
What happens is that as a wave builds, it uses the seafloor to support itself, when the seafloor drops down, the wave doesn’t break but just rolls right over until the seafloor rises back up again (indicating the end or closest edge of the hole).
When the “wave” reaches the final edge of the hole, it regains its support and quickly forms again to crash shortly thereafter. That explains why the water remains relatively cleaner in a deeper pocket. But why wind ripples?
Wind Ripples And What They Mean For Reading The Surf
The image below shows a deep hole. Now, I can’t stress this enough. When you’re learning how to read the beach, it doesn’t necessarily matter if you’re unsure of what you’re seeing. If you can identify one spot as different or more textured than the water around it, give it a shot. Understanding what it is will come with time.
Nonetheless, as you look at this illustration, take note of the disturbed surface within the red circle. That’s what I mean by “wind ripples”.
It looks like how water would usually look on a windy day, but this isn’t being caused by wind. Rather, when you have a hole underneath, the flow of water is interrupted and it billows like this.
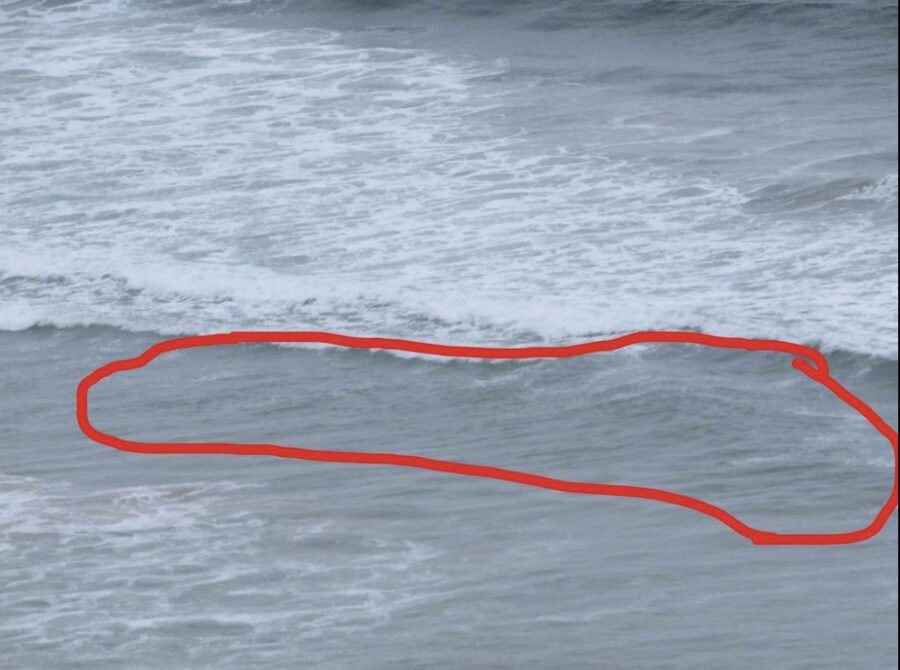
The photo above is a little tough to see, especially because it’s getting ripped into the wave that’s about to crash, but hopefully, the video clears it all up for you.
Arrive At Low Tide – Fish The Rising Tide
If you’re new to reading the beach, showing up at a low tide can help you learn the structures a little better.
Scout the beach looking for holes and other structure just above the water line or in the shallow water. As the tide then rises, the structure that you found while unsubmerged, will then be submerged and you’ll be able to see what it looks like on the water’s surface.
The same exercise can be done in the opposite fashion. Show up at high tide, find some structure, guess what it is, and when the tide goes out, see if you were right.
Many anglers ask if high tide is the best time for surf fishing and the simple answer is that it depends. Sometimes it is and sometimes it isn’t. Some locations it is, and other it isn’t. So don’t get it stuck in your brain that you can only fish a rising tide or a high tide. Try them all and learn for yourself.
Thank you, Nick. This blog in particular took a lot of time and effort on your part and we really appreciate it!
Thanks for the kind words, Kirk!
Good morning Nick, I loved this article, very informative my friend. I know more now when reading the surf….Good job
Again thanks for the article and have a peaceful week.. I’m going to try and get out this week again.. I’m so glad I took up this Hobby it’s good for my soul… Yahoo !!
Awesome! Thanks again for all the kind words you have for me and have a wonderful week.
Thanks for the info, I’ll be using this new knowledge hopefully this Friday! Hope to see you in action one of these days! And share stories and techniques.
Sounds awesome! Best of luck to you and maybe we run into each other.
this is great.
i am going to share it with all my buddies, after i catch a few fish 😉
Hahah love it! Thanks for the support and I always appreciate it when you’ guys share my content.
Thank you so much for helping me understand where to fish in the surf for at least a chance of being successful, I kayak fish inshore in San Diego a lot but plan on doing a road trip fishing the Calif beaches starting at IB and working my way up north.
Definitely sounds like a fun little road trip! Thanks for the support.
Great article as usual Nick! Thanks for taking the time to explain reading the “terrain”. If I could ask, where were you making the video?
Thanks, Matt! It was shot at 3 different beaches. We had Del Mar, Encinitas, and Torrey Pines.
Great video. Almost like reading a river. Very important to learn.
Thank you! It definitely takes time but it becomes second nature.
I thought it was very helpful thanks Duane. From Washington
Thanks, Duane! Happy to hear the content is even helpful outside of So Cal.
Thanks a lot for this article. I was wondering, in the first photo above, the one with red and yellow arrows, that trough looks super shallow and it looks like the incoming wave will just wash right over right so it would be hard to spot. How deep do you reckon it is in that photo?
That photo is the most helpful of everything to me because it’s subtle, and I usually find myself casting right behind that incoming wave rather than in the trough you are pointing out. I saw you wrote the spot isn’t optimal yet, where would you cast in that area if you had to fish right then (like I often do, rarely can I spot check and come back later that day).
Thanks in advance. More posts on structure please, especially the subtle stuff!
Thanks for the support! If I were fishing the spot in the photo right then, I would likely cast just over the wave where I know the troughs are. I’d assume there were more troughs beyond that point. But, if the tide were rising, in an hour or so, that spot would be money! I’ll try to talk more on structure in the future.
Thank you for the video and blog. I am relatively new and focusing in 2022 on the surf and reading it (trying), in hopes to be as successful as you.
Just keep putting in time and it should all come pretty naturally. Thanks for the support and tight lines!